Countersink Spec Table
This specification follows ISO (International Organization for Standardization) standards. ISO ensures cross-border compatibility, making it ideal for multinational projects, export equipment design, and global parts procurement.
A conical recess that allows flat-head bolts/screws to sit flush with the surface.
Practical Notes
- Countersink angle must match flat-head bolt angle (90°/120°). Mismatch causes tilted bolt seating.
- Too-deep countersinking recesses the head below surface, harming appearance. Match depth so head top is flush with surface.
Selection Guide
Conical recess for flat-head bolts to sit flush. Head angle (usually 90°) must match countersink angle. Used where flush surfaces are needed — aircraft skins, furniture tops.
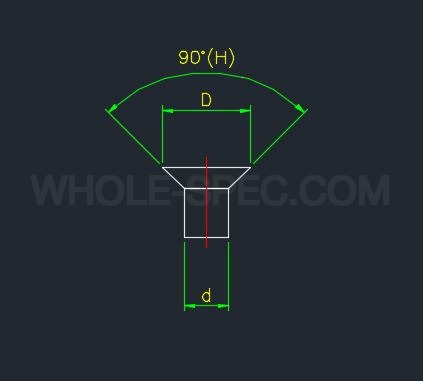
ISOCountersink
7 sizes| Bolt | D | H/Angle | d | Standard | Note |
|---|---|---|---|---|---|
| M3 | 6.72 | 90° | 3.4 | ISO 10642 | For Flat Head |
| M4 | 8.96 | 90° | 4.5 | ISO 10642 | For Flat Head |
| M5 | 11.2 | 90° | 5.5 | ISO 10642 | For Flat Head |
| M6 | 13.44 | 90° | 6.6 | ISO 10642 | For Flat Head |
| M8 | 17.92 | 90° | 9 | ISO 10642 | For Flat Head |
| M10 | 22.4 | 90° | 11 | ISO 10642 | For Flat Head |
| M12 | 26.88 | 90° | 13.5 | ISO 10642 | For Flat Head |
Key Features
- Conical (90°/120°) countersink for recessing flat head bolts and rivet heads
- KS B 0237 / ISO 15065; countersink angle and diameter (dk) standardized
- After machining, fastening surface is completely flat; aerodynamic surface with no protrusion
Key Applications
Aircraft skin panels, ship decks, furniture tabletops, electronics exteriors, architectural finish hardware
In-Depth Guide
90° (metric) vs 82° (inch) angle trap — the most common countersink mistake
ISO 10642 / DIN 7991 / JIS flat heads are 90°, an ANSI inch socket flat head is 82°, aerospace uses 100° and 120°, and some wood screws are 82°. Put an 82° screw in a 90° countersink and the head touches only at the rim, wobbles, and will not sit flush. The reverse — a 90° screw in an 82° countersink — makes only the tip of the head contact the bottom, so the bearing face barely touches. The countersink angle must match the head angle of the screw you will use, and countersink cutters come in separate 90°, 82°, 100° angles, so confirm the drawing and screw spec before choosing the cutter.
Control by surface diameter, not depth — half the diameter error is the flush error
A countersink seats the head with its cone, so the variable to control is the countersink diameter at the surface, not the depth. At 90° the relation flush error = countersink diameter error ÷ 2 holds, so cutting the diameter 0.1 mm oversize sinks the head 0.05 mm. Cut too large and the head drops below the surface with a knife edge around it; cut too small and the head stands proud. So instead of measuring depth, measure the diameter and flushness with a countersink gauge or flush gauge, and use a microstop to repeat the diameter on machine countersinks.
Thin-plate limit — when a knife edge appears, dimple instead of cutting
If the plate is thinner than the head sink depth, the cone breaks through the plate, the bearing face is lost, and a sharp knife edge is left. As a rule, you need a minimum plate thickness ≈ head sink depth + about 0.5 mm for a cut countersink to work. Below that, instead of a machine (cutting) countersink, form the seat by dimpling — pressing the sheet with a conical punch. Dimpling deforms rather than removes material, keeping the section, which is why it is standard on aircraft skins. In short, on thin plate do not cut the countersink — press it.
Countersink vs counterbore — why a flat head is weak in tension
When no protrusion above the surface is allowed (fully flush), use a countersink with a flat head; when the head only needs hiding but strength matters more, use a counterbore with a cap screw. A flat head is weak in tension because of the cone wedge effect — part of the clamp load is turned into a radial force pushing the countersink wall outward, which lowers clamp efficiency, and in thin material the head can pull straight through the hole (pull-through) or crack the surroundings. So on joints with heavy vibration or repeated tension, a counterbore with a cap screw is safer unless a flush surface is truly required.
Tooling and chatter — single-flute and low speed on soft metals, multi-flute leaves chatter
When countersinking a soft material like aluminum, a fast multi-flute tool leaves lobed chatter marks that make the cone non-round — and then the head wobbles and will not sit flush. On soft metals use a single-flute tool, or a tool with 0° to negative rake, at low speed to get a clean cone. When the depth must be repeated across many holes, use a microstop countersink with a pilot cage to hold the diameter constant. A chattered countersink has to be reworked, so it pays to get the tool and cutting speed right from the start.
FAQ
How to determine countersink diameter?
Machine slightly larger than flat-head bolt head diameter (+0.5mm). Exact dimensions vary by bolt spec — refer to specification tables.